Author: Neil Thompson

  • How To Make Leaf Mould | Fast And Easy Step

    How To Make Leaf Mould | Fast And Easy Step

    Leaf mould is a decomposed organic natural soil improver for the garden which made from the autumn broken leaves. Bacteria & fungi decompose those leaves and turn them into a very useful ingredient for potting soil or compost. You can make leaf mould for your garden by free fallen autumn leaves. Today I will share how to make leaf mould in very fast and easy steps.

    How To Make Leaf Mould

    Step 1: Find the right leaves

    In autumn lots of leaves will fall from the tree. Almost all leaves will turn into leaf mould over time. But there are some leaves out there that will break most quicker with little effort. According to the research, Oak and Beech leaves are broken down more easily. 

    Holly, conifers, pine needles and other evergreen leaves shouldn’t be used for leaf mould as they can slow down the process. Below you will find some examples of them.

    Quick breaking leaves: Ash, Beech, Birch, Cherry, Elm, Hornbeam, Lime, Oak, Poplar, Willow

    Slow braking leaves: Hawthorn, Maple, Magnolia, Sycamore, Horse chestnut

    Evergreen leaves: Aucuba, bay, Holly, Laurel, Photinia, Rhododendron, Skimmia

    Step 2: Collecting leaves 

    Collecting leaves isn’t an easy process. You can collect the leaves from your garden and other public places. Try to avoid the roadside as the leaves might be nasty and polluted. Also, they may contain toxins and oils from cars which can take longer o to dissipate. Also, those roadside leaves aren’t good for your vegetable beds. 

    You can use leaf blowers to make the job easier. You can purchase a blower from this link

    Collect the leaves and store them in a bag for the next process.

    Step 3: Build a leaf bean

    In order to store the leaves, you need to create a leaf bean. You can create a square bin or cage by using fenc or net. Build a bean in an open space of your garden.

    To make the bean you can use four wooden frames or bamboo for supporting the four corners of the frame. Keep the bean at least 1 meter wide and 1 meter high. 

    Leave molding is a very long process, to speed up the process turn the leaf regularly so that the rainwater can go through easily and help to break down the leaves. Also, you can lightly water them if they are drying. This will make the process faster. You definitely need to check the mold otherwise it may take 2-3 years to get the leaves mold.

    Step 4: How to find out if the mold is ready

    As this is a lengthy process you need to wait a long period to get a proper leaves mold. When the mold is soft and crumbles this is ready to use in a soil mixer. 

    How To Use Your Leaf Mold

    How To Use Your Leaf Mold

    Previously we have learned how to make leaf mold, now you will learn how you should use your leaf mould. When you have identified that the mold is ready you can use them in your garden.

  • How To Make Seed Tape | Step by Step Guide

    How To Make Seed Tape | Step by Step Guide

    How To Make Seed Tape

    Nowadays many gardeners use seed tape for their gardening. Also, many gardeners don’t know how to use this or how to make this. Seed tape is a very basic idea for sowing seeds in a uniform manner. 

    Seed tape is ideal for plants that you want perfectly spaced apart. Small seeds are really hard to sow in a straight line. For example, if you are sowing carrots it’s difficult than other seeds to sow in straight. People usually mix small seeds with sand and sow them in a straight line. In this process, you can’t ensure the space between the seeds. To avoid this situation seed tape is the best thing to do. Also in this process, you can save the seeds from being waste. 

    You will find the seed tape in your local market if you want to buy some. You can even make your own seed tape. Today I will share how to make seed tape at home. 

    How To Make Seed Tape

    Things that you need:

    1: Flour 

    2: Water 

    3: Newspaper 

    4: Scissors

    5: Ruler

    6: Pencil

    7: Seeds

    Preparing the tape:

    First, you need to prepare the tap. I will recommend newspapers as it’s a process of recycling and the best use of newspapers as well. Also, you can use tissue and paper towels for this. Get a sheet of newspaper and cut two pieces in the measurement of one inch wide. Now your tape is ready for the next step.

    Preparing the glue:

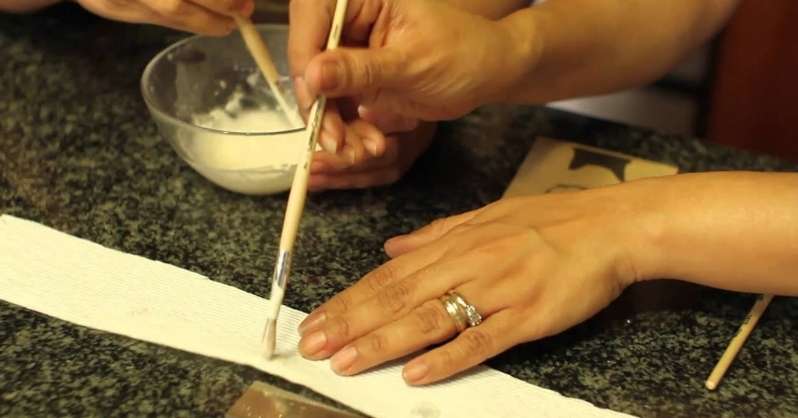
    You can prepare homemade glue by using flour and water. Take some flour in a bucket and add some water until it’s turning into thicky paste forms. If it thick enough to sit on the end of a stick or pencil without dripping the paste is ready to go.

    Distance measurement:

    Now you need to mark the sheet with the ruler where you will place the seed and little drop of the paste that you have made before. When you mark the dot it’s determined how far the seeds will be from each other. After marking the dot you need to take a small stick or pencil to drop a little paste on the mark.

    Placing the seeds:

    Get your seeds and place them on top of the paste dot. Use your fingers or a pair of tweezers to place the seeds in the right place.

    Final Step

    By using the same process you need to get some glue with the stick or pencil and place them all along with the paper totally different areas. Now you need to place the second piece of newspaper on top of this. Run your finger all along with the paper so that the glue holds the paper together. Allow the tap to dray and you can write the plant name on it for identification. 

    Now the seed tape is ready to put down the garden. If you are not planting them now you can store them in a jar and cool place. That’s how you will make your seed tape.

    Best bucket gardening ideas

  • How To Make a Wooden Planter | Follow 6 easy Steps

    How To Make a Wooden Planter | Follow 6 easy Steps

    How To Make A Wooden Planter

    For many people, gardening is a very therapeutic experience. Whether you like to grow vegetables, flowers or just enjoy the green space that your garden provides, it’s easy to get lost in how much time and effort goes into creating something so beautiful. This article will discuss how to make a wooden planter of your own using tools that are readily available at any hardware store.

    How To Make A Wooden Planter

    The items that need for this project:

    • Saw
    • Drill
    • Wood screws 
    • Tape measure
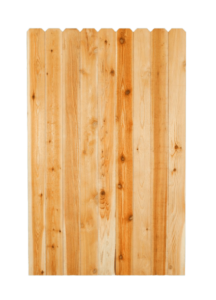
    • 9 Western Red Cedar Pickets (5/8” x 51/2” x 6’)
    • Pressure-treated timber 8 foot (2×4)
    9 Western Red Cedar Pickets


                 (9 Western Red Cedar Pickets)

    Step1: Build A Bottom Frame

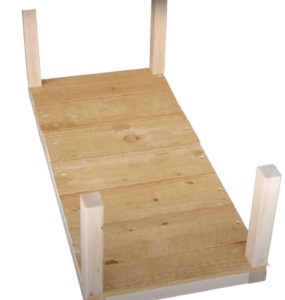
    After getting all of those supplies first you need to create a frame with the 8-foot timber which will go inside and hold up the bottom shelf. 

    To do this pick the 2×4 and rip it half through the middle. You can use a table saw or skill saw to do this. It depends on which one you have. Then cut down the legs and attach them together with three-inch wood screws. Now the frame will be something like this. 

    Step1

    Step2: Attach floor with the Bottom frame

    Once your frame is ready now we need to move to the 6 boards for the floor. 

    Cut the Western Red Cedar Pickets into six pieces and attach them with the frame with screws that we have made before.

    Step3: Inner frame

    Now we need to add the inner frame. For this, we need 4 pics of (2×4) 

    We can cut the 4 pieces of them according to the required depth of the box. 

    Now attach the 4 pieces from the bottom side of the floor that we have made before something like this: 

    Step2

    Step4: Siding

    The next step is siding. For this, you need to Cut the pickets to length according to the dimensions of your box. You need six longer pieces and six shorter pieces. On each side of the box, you need to attach the 3 pieces of them. Make sure you are attaching them outside of our previous frame. Now your frame will be something like this.

    Step5: Corner Trim

    Now, pick one of the Red Cedar Pickets and cut into through the middle. 

    After that cut them into 8 pieces according to the height of your box. 

    Now attach 2 of them on each side with 4 screws same as the image and cut the additional wood from the upper side. Now the frame will look like this.

    Step6: Upper Frame

    Now with the last pics of our Red Cedar Pickets, we need to cut them into 4 pieces according to the box outside measurements. Cut the corner in 45 degrees so that they can fit with each other like a picture frame. Those pieces will be fit into the top of your box. Place them into position and screw them with the box. 

    Your planter box is now ready and needs to give a quick polish. Before put plants on the planter box, some important tasks are left behind that you need to do. Get a spray bottle and mix one part of chlorine with nine parts of water and spray the surface of the planter. Scrub the planter with a plastic dish scrubber. This will kill the harmful insect for your plants.

    The drainage system is also important for your planter. In order to keep the plants good in the container, a good drainage system is required in the planter.

    Drill drainage holes in the bottom of the planter. Three or four 1/4-inch-diameter holes or one or two larger holes drain excess water out of a wood planter. Seat your planter on planter feet, flat stones, or other objects that elevate the wood off the deck, porch rail, or ground surface. You can do a quick check of how fast the water drains out by adding water. If the water runs out easily you are good to go with your wooden planter.